Saturday, August 13, 2011

Tails o' the Sea

Oh boy! What have I gotten myself into this time...This is proving to be messier and more difficult than I thought, but I'm already committed...(or is that I should BE committed!) I slathered on a thicker layer of Alex caulking, let it get gummy and then laid down fish net. I was going to try the metal grate "stamp" thing, but couldn't find a grate with the right pattern locally. So, I know I had seen someone using fish net to make the scales; however, what I didn't realize is that the net doesn't come off of the caulk as easily as I thought it might. Either that, or I have to let it get even more "cured" before I try pulling it off.
Since the caulk is still "moldable", I experimented with sculpting the scales where the tail goes into the fluke - using an ordinary spoon...It seemed to work out pretty good. I may have to add more caulk as I go along to fill in holes and spots, but I think that may work out pretty good. For the fluke, I used a combination of a chopstick and a sponge paint brush that I had cut so that I could give the fluke some texture.
It doesn't look too bad so far for my first attempt at this, but I'll need to work at it some more to "clean it up"  before I consider it ready to paint. Now to find an affordable air brushing kit and generator...

Well, that was a bad idea - soon after I went to check if I should pull the netting out, I realized that I had let it dry *too* long and that I couldn't get the net out without tearing up my fabulous caulking job. So, in a panic, I posted to the MerNetwork forums and asked for some advice. Merbel, who wrote the tutorial I am using, answered me and said to remove the net "immediately!", that it was better to waste the caulk than to ruin the neoprene and that I had indeed left the netting in the caulk for too long. She said I could always go back over it with more caulk to "fix" it. So, I carefully tore the netting away (it was a real bi*ch, I tell you!) and was left with quite a mess...it totally tweaked most of the tail and took away a good deal of caulk with it.
Interesting effect!
It did leave some kind of cool looking intermittent scales though...So, back to the drawing board. I tried to fill in some of the empty spots - I may just kind of leave it with the intermittent scales...gives it a kind of punk, tattered fish effect, maybe more realistic and not so perfect. I'm still working on it and trying to figure out different ways to "sculpt" the scales. The edge of a teaspoon works pretty good if you press it upside down into the caulk while it's still kind of gummy and sticky.
I really wish the metal grating had worked out. I ended up finding some at Lowe's, but I felt that the shapes were too small for the size of the tail. I thought about finding one of those copper cake/jello molds that look like a fish and using the scales on that as a stamp. I still may try that if I can find one....there's got to be a better way!

Monday, August 8, 2011

Tails o' the Sea

After having been side tracked for most of the summer with other things (mainly a grueling schedule at work, and my 30th class reunion), I am back on track with the mermaid tail. In my first post I mentioned that I hadn't taken into account how long my tail would actually have to be with the fluke included, and therefore hadn't bought enough neoprene - but wait! I had a brainstorm and solved my problem, thereby saving myself a trip and some cash. I just used a little thing called - flat-locking. It's a way to join two pieces of fabric (or in this case neoprene) together, and since it was going to be covered with latex caulking anyway, it would never be seen.
I made the join in the fluke, because it would be less noticeable and it wouldn't matter if it was watertight, as you don't want your fluke filling up with water anyway. It worked like a charm! My fabulous Husqvarna Viking Sapphire 835 sewing machine handled the neoprene with ease!
Now for the latex part - I bought a buttload (yes, that is a technical term) of Alex silicone latex caulking at Walmart (Caulking -it's not just for bathrooms anymore!), the kind that dries clear and some cheap sponge paint brushes, as I'm sure I'll go through quite a few of those...
I laid out one side of the tail on my work table and squeezed the caulk onto it, using the sponge paint brush to smooth it out and "paint" the caulking over the tail. I left the very edges as bare as possible so the two sides can be sewn together later. The first layer doesn't need to be very thick, so I spread it out as thin as possible but still making sure I had coverage.
LOL! Note the "Pirates of the Caribbean - White Cap Bay" Lego box
It was a bit hard to spread thinly, but I think I managed to do it correctly (how would I know, I've never done it before!) So, now to let it dry. I'm not sure how long it is supposed to take, but I would imagine at least a couple of hours. I'll do the other side tomorrow after this dries, as my work table wasn't big enough to do both sides at the same time (I had to duct tape that Lego box to the end of the table to make it just long enough to lay the tail out without any hanging over the edge)

Friday, July 15, 2011

Georgie Girl

I finally received my "Georgiana" 18th century shoes from American Duchess the other day in the mail! Yay! They will join such illustrious historical shoes in my closet as my red "Titanic" boots, my mid-19th century side-scallop boots and my hand-made leather ghillies! Mr. T thoroughly approved of them!
I got the round buckles, but I think I may get some square ones too, just for a different look...Or I'll try the "ribbon lappet" thing.
I had a hard time deciding what color to dye them! Pink? Blue? Green? I decided on blue, with green grosgrain trim around them, so I fearlessly jumped into the whole dyeing thing with reckless abandon! Was I afraid of ruining them? You bet! But I figured the worst I would have to do is make them some sort of darker color or maybe try dye remover. At any rate, I decided to try the tutorial on dyeing shoes by The Dreamstress I picked up some royal blue dye at Walmart - it was Tulip brand - less than a buck - and I wasn't sure how well it would work, but it was either that or Rit and I wasn't really sure there was that much of a difference except price.

I heated up some water on the stove, poured it into my stainless steel sink, added the dye and stirred it up. I then took a paint brush - all I had was a 1" wide paintbrush, not the wide one that is used in the tutorial, and I crossed my fingers that it would work. First, I tried it out on the swatch that was included with the shoes (what a freakin' awesome idea! Thanks, Lauren!), I let it dry and it didn't look half bad, so I dove into the shoes. Here is one shoe after one coat....Not too shabby! I was definitely impressed with both the dye and the ease and results of the technique of "painting" the dye on as opposed to "immersing" something in dye.
The lighting was a little dark in my kitchen, and the shoe was a bit damp, so it looks a little darker in this picture than it actually is after one coat. It looks a little closer to this picture:
I'm really excited about this! I think I'll give it one more coat after it dries good and call it a day! I've never dyed shoes before - I've been in weddings and had the shoes dyed, but this is so easy and SOOO much cheaper, that I would recommend this method to anyone who wants to dye a pair of silk shoes!

Here are a couple more photos of the finished product with different looks to the shoe. After I finished the dyeing process, I hand sewed green grosgrain ribbon around the edges. I also made a green and blue cockade and tried both the round buckles and square buckles.


The lighting was a little different on the last two pictures, so they look lighter blue than they actually are - The color is closer to the blue in the first picture with the round buckles.

Hawaii 5-O

This ended up taking a little longer than usual...After being side tracked with visiting relatives, relative's birthday parties and more visiting relatives, not to mention work has been BRUTAL, I *finally* finished this dress....or so I thought....
You'll have to excuse the really baaad lighting - it was late and I had just wrestled the dress onto my doppelganger, who I found out was quite a bit bigger than I am right now, and I could barely close the zipper. When I actually tried the dress on myself, the top and the waist were too big, so, I will have to take it in - ugh, what a pain in the arse...but I WILL have it finished by next weekend!

Sunday, June 26, 2011

Hawaii 5-O

Just a quick side project before I delve back into the mermaid tail....plus I have a deadline for this one. My 30-year high school reunion is coming up the third week of July. We are having an "informal" BBQ thing and will have a float in our local "Doo-Dah" parade (it's a small town...we have nothing better to do). The theme for our reunion and the float will be "Floating Down Memory Lane", and we plan to have things to do with summer, lazily floating down a river, wearing Floaties or inflatable rings. Which, by extension, made me think of warm weather, luaus, drinking mai tai's out of a tiki glass, palm trees (you see where I'm going with this, right?) But where to fit something "costumey" into the picture? Well, I have this Simplicity pattern for a fabulous, retro 50's Hawaiian-style wrap dress I had made up once in this really cute fabric that had a white background with red and blue parrots on it. Unfortunately, it somehow became a victim of my mad frenzy of getting rid of anything and everything that had to do with my old life during my divorce and I no longer have it. So! Time to make a new one....
We have two...count 'em...two places to get fabric within a reasonable driving distance from where I live - Walmart and JoAnn. Apparently upstate NY isn't into the whole "tropical" motif thing, so pickin's were slim. However, I got lucky and found a cute pattern with a black background, which I think will turn out very nice!
And a flower for my hair!
This shouldn't take too long. I'll post the finished product, as shots of every step of this could be quite boring...
And as of this posting, I have the top section and wraps already finished. I'll start on the skirt section tomorrow.


Wedded Perfection Two Centuries of Wedding Gowns - The Exhibit

I had always thought that "ART" was the last bastion of all things avant garde...pushing the envelope, breaking the rules - where someone could swipe some black and green paint on a 5 foot tall canvas, give it a title like "Intrigue" or "Girl With Straw Hat Picking Flowers", hang it up under a soft spot light and be hailed as one of those who somehow is privy to things that the rest of us are not (like how anyone in their right mind could consider black and green paint smeared on a piece of canvas as "art") But apparently the Cincinnati Art Museum who loaned the "Wedded Perfection" wedding gown exhibit to the Munson Williams Proctor Art Museum failed to get the memo...
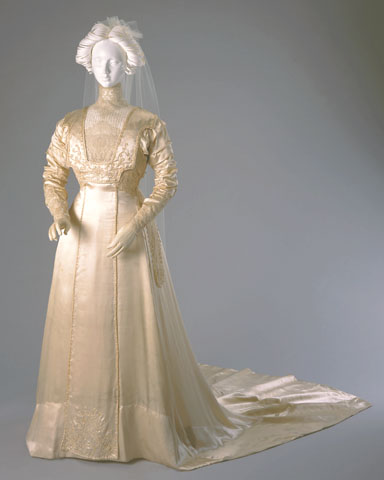
I walked in, prepared to take pictures of the dresses I liked with my iPhone and capture as many of the details of the decorations, bustles, lace and pleats as I could. I snapped a picture of a rather elegant, close fitting gown in a cream velvet that was displayed dramatically on a staircase when a voice behind me said, "Ma'am, no pictures are allowed. It's not us - it's the Cincinnati Museum of Art's rule".
You've gotta be kidding me! No pictures? Why? I wasn't using a flash, so there was no chance of damaging the delicate fabrics through some sort of burst of UV rays from my flash. I was using my cell phone camera, so no chance of taking devastatingly fabulous, hi-rez photos that I could then sell as prints and become independently wealthy from. There were no audio-animatronics that I was aware of that could have malfunctioned from the use of my camera, and I had every intention of purchasing the overly-priced museum book that accompanied the exhibit once I exited through the gift shop...
This dress is made from.....latex gloves!
Now, normally I am a "rule-abiding" citizen - I recycle, I clear my table off at the fast-food restaurant, I don't take up two parking spaces - but when the "rules" are ridiculous and make no logical sense, then my inner teenager comes out, and I look for ways to "bend" the rules (they're more like guidelines....really).
Hmm, I know how she feels....
So, I "surreptitiously" took a few photos here and there. Consequently, many of them are blurry. I couldn't get any close-up details, nor could I get more than one angle. The museum guards (more like elderly gentlemen in suit jackets) shadowed everyone viewing the exhibit as if the Hope diamond and the Mona Lisa were on display. Even if I *hadn't* been breaking the rules and sneaking a photo here and there, I would have been EXTREMELY annoyed. This made enjoying the exhibit almost impossible.

I understand that it would be annoying to the other patrons if everyone was running around taking flash photography and generally being a nuisance, but I was quiet, using my phone camera and NO FLASH. I was not bothering anyone....
Russian Fantasy Wedding Dress
After I got busted the second time by a guard with a huge mustache, he kept tailing me like I had gotten caught shoplifting at Walmart....I was really starting to get annoyed now...
The whole point for a "costume geek" to go to an exhibit of vintage clothing or movie costumes is to TAKE PICTURES, lots of pictures, from every angle - close-ups of all the trim - every puff, bustle, button, drape,  pleat and ruffle....anything that shows construction, seams, hooks, laces, zippers, etc....All for the purposes of RECREATING THE DRESS. Otherwise, what is the point? Sure, maybe if we can draw, we could spend all day trying to "sketch" these things, but really.... that is neither practical nor always possible. So, to forbid taking photos to someone like myself ruins the whole exhibit, which, happened here.
I ended up leaving earlier than I had anticipated, mainly because I didn't feel like being followed around like I was a spy who had stolen the plans to the Death Star, but also because the whole atmosphere was stifling...
Oh, and....I didn't buy the book that went with the exhibit - take THAT Cincinnati Museum of Art!


Thursday, June 23, 2011

Wedded Perfection Two Centuries of Wedding Gowns » Munson Williams Proctor Arts Institute

While everyone is running around championing the cause of gay marriage (and I say, "Why not double the business for the divorce lawyers?"), I am currently very much opposed to, down on, against and otherwise fed up with the "institution" of marriage; however, that doesn't stop me from drooling over the fact that the Munson Williams Proctor Art Museum has just opened a new exhibit titled, "Wedded Perfection: Two Centuries of Wedding Gowns", featuring a collection of more than 50 wedding gowns dating from the late 1700s to today (Meh - I couldn't care less about anything after 1950 or so....)
The exhibit, on loan from the Cincinnati Art Museum, "will explore the origin of western bridal traditions, periods when the ‘traditional’ white wedding dress was not worn, trend-setting wedding dresses, contemporary and avant garde wedding dresses, and influential designers." and "women’s role in society and within the institution of marriage with the evolving aesthetics of wedding gowns".
I may head over there this weekend, camera in hand, to check it out.

Monday, June 20, 2011

But it's not a Remington

No reason for this post other than the fact that my flintlock is full of win! Two words - Grendel's Cave...


- Posted using BlogPress from my iPhone

Tails o' the Sea

This may prove to be my most ambitious project yet - Well, there was the pool table pirate ship...and the working guillotine (sans a real blade)....and of course the yurt, the drop weight loom....Oh, nevermind all that! Okay, let's just say it may be my oddest project with the most potential for going completely wonky - but since when has that ever stopped me...

I give you.....A Mermaid tail. And not just any mermaid tail, but one which can me worn to swim with in water. You don't believe me? Well, do not take my word for it...go ahead, ask Helga! (20 points if you got that) But I digress...There actually exists a community of people who do this sort of thing from professional mermaid tail makers like Eric Ducharme of Mertailor, who caters to the rich and famous and the Mermaids of Weeki Wachee, to little girls in their bedrooms uploading videos to YouTube on how to make a mermaid tail out of Lycra and cardboard.

But the best source I found for what I wanted to do was somewhere in between; The Mermaids and Mermen Costuming Forum on Yuku. Oh, yes, you truly can find anything on the Internet. After browsing around the site for a while, I found the Holy Grail of MerTail tutorials thanks to a wonderful woman named "Missfit1023" on DeviantArt. I had my starting point and basic list of supplies I would need.

First, I would need a "Monofin" - Several people on the forums were debating the merits of this brand over that, homemade over store bought - I went for convenience and price and found a Finis Wave on ebay for about $40. Afterall, I'm not going to be a professional mermaid and be swimming with it for 3+ hours a day, every day, so I didn't need the stiffer "Rapid". This will be fine for my porposes...This goes "inside" the tail so you can truly propel yourself in the water.
Next - Neoprene....ya know...wetsuit material. I explored a couple of sources and was going to go with Stretch House, but I actually found some at my local.....JoAnn's has Neoprene?! Not only did they have it, but they had it at a JoAnn's in my area, which, if you knew where I lived, we have NOTHING....and the price was as cheap as I'd seen it online, $18 a yard...BUT it's also 60 wide so you can get away a little cheaper - Of course, stupid me, didn't take into account the length of the fluke (I should have made my pattern FIRST and THEN bought the Neoprene) and I didn't get enough, so I'll have to go back and get some more. Note to self: Make the pattern FIRST, THEN buy the material :-)

I then made my pattern. Years ago....and I do mean YEARS....like probably 20....I bought a roll of butcher paper at a Price Club store. I have used that paper for countless patterns and craft projects, and I STILL have most of the roll left. It was the best $25 I ever spent! I rolled out some paper, lay down on it and "traced" myself with the Monofin on, getting the general shape and size of my legs from mid-abdomen down and around most of the Monofin. I then made my tracing about an inch and a half bigger than where I traced for sewing and fudge factor, cleaned up the lines, added a tail fluke and cut it out. This is how my pattern turned out.
Stay tuned...more to come.

- Posted using BlogPress from my iPhone

New Life for a Straw Hat (or Making a Tricorn in 3 easy steps)

Take one plain, round, medium-brimmed straw hat - I got this one at a thrift store for $3.00...


Spray with water until slightly damp, pinch up the sides in three places. Clip with some binder clips and let dry.


Decorate with cockades, feathers, ribbon...whatever you like. (Thanks to American Duchess for the tutorial on making cockades :-)


Take a few stitches with some heavy duty thread to tack the sides to the crown of the hat for extra strength. I glued seam binding around the edges of mine, but you could also sew it on if your machine can take it or if you want to do it by hand...And there you have it!


Meself wearing said hat... ;-)


Sunday, June 19, 2011

Elizabeth Swann's Stays: POTC:COBP - A Study

Okay, I'm gonna kick this baby off with an oldy but a goody from my "Live Journal" site (which I never go on anymore, so I may as well bring the good stuff over here). This was first published on May 28, 2008.

For those of you wishing to recreate the pink stays that Elizabeth wears in POTC: The Curse of the Black Pearl, this is a study and break down of the stays and it’s elements, gleaned from pictures of the actual stays which were sold on ebay, screen captures, source material on 18th century stays in general, and my own impressions and interpretations. This will hopefully allow you to recreate the stays as closely as possible to the original.


As always, the usual legal disclaimers apply. This is for educational and entertainment purposes only. All characters, likenesses, logos, images, etc. etc. are the sole property of the Disney Corporation and its minions, etc. etc., so on and so forth.

The construction methods used on these stays are modern construction methods (i.e. machine sewn), as befits a clothing item for the screen, and the fact that these particular stays were “sliced” open in one scene. Thus, numerous copies were made with the front being closed with “lacing” and the lacing being “sliced open”. The general shape of these stays is consistent with the 18th century silhouette and is very similar in look to the stays on page 135 of “Period Costumes for Stage and Screen 1500-1700” and also on page 42 of “Corsets and Crinolines”. The pattern pieces and boning channel arrangement look to be something like this:


These stays are made up of eight pattern pieces, four on each side – front, side front, side back and back, with a total of 16 tabs, eight on each side; one tab on each front, three on each side front, three on each side back and one on each back piece. The lacing in the front is a false lacing, i.e. it has no function of being able to be laced and unlaced, and there appears to be a modesty placket of some sort in back of this lacing. This description comes from the Disney auction of these stays: "Specially outfitted with a Velcro-fastening front beneath mock laces, this peach-colored corset with chain-stitched trim..."

The front lacing appears to be a thin, white or off-white cording. It is hard to determine from the photos whether or not this lacing is accomplished with small white or pink eyelets, or if the lacing is directly attached through the fabric; perhaps through a hole pierced with an awl, so that the fabric does not “tear” but rather would close back up around the lacing.

The fabric that is used on the outside is some type of woven fabric, which is a peachy-pink alternating with white, giving an almost “striped” or “corduroy” effect from a distance. The inside is lined with what looks like plain old muslin. The seam allowances look to be folded around and tacked down on the inside of the stays. If you look closely at the photo below, you can see through the muslin what looks like a dark-colored boning and on the bottom one, you can just make out some slight ridges. It appears they probably used spiral steel boning, perhaps for movement sake, instead of something stiffer like white steel boning or even plastic whalebone, which would have been more period.


What appears on first glance to be “piping” at the seams, actually seems to be some type of off- white woven trim like a gimp or a braid, with what looks like small loops or picots on one side. This same “trim” is also used as binding. According to the Disney auction description, this is “chain-stitched trim”, so what look like picots, could actually be a machine chain stitch or decorative looped stitch used to attach the trim and add a decorative element.


It is laced in the back using the correct 18th century lacing style; however, instead of hand sewn eyelets which would be period for lacing, these stays have small, white, metal eyelets and uses an off-white, flat, shoelace style lacing. The shoulder straps tie to the front with the same thin, off-white lacing that is used in the front lacing.

Two of the versions of these stays are different in the back. I’m not sure why. In the photo below you can see where the “back” piece is clearly wider in one than the other. You can also see the “placket” which is where I’m assuming the Velcro fastening comes in. It appears to be boned in the photo on each side of the placket, but it may have something to do with the Velcro, as I’m not sure why they would need to have the extra boning there, as clearly there are bones on either side of the front piece.


SOURCES:
http://www.willofasparrow.com
http://www.costumersguide.com
http://demodecouture.com/realvict/1700s.html
- “Pirates of the Caribbean: The Curse of the Black Pearl” DVD
- “Period Costumes for Stage and Screen: 1500-1700” Jean Hunnisett
- “Corsets and Crinolines” Norah Waugh